 |
iVS3D v2.0.9
|
|
iVS3D v2.0.9
|
In a usual workflow the sampling plugins are used to select images for the following 3D reconstruction. These plugins are optimized to use all processor cores or the GPU and usually scale linearly with the number of images and their resolution, so execution is rather quick. This is not true for the 3D reconstruction with COLMAP and the meshing and texturing with OpenMVS. Many of these steps do scale quadratic or cubic with the number of images. Because of this we rely on our sampling plugins to reduce the number of images drastically. However even on high-end hardware, the reconstruction and texturing process still takes a significant amount of time, usually from a few hours to multiple days for a high quality reconstruction. On lower-end machines and laptops, reconstructions take even more time. To make use of the fastest hardware available to you and to avoid blocking you PC for many hours, iVS3D offers functionality to run the time-consuming 3d reconstruction, meshing and texturing on a remote server. To make use of this you will need a second computer, i.e. a desktop machine or a GPU server. We refer to this as the server. In the following we will call your main system (e.g. your laptop/desktop) the client.
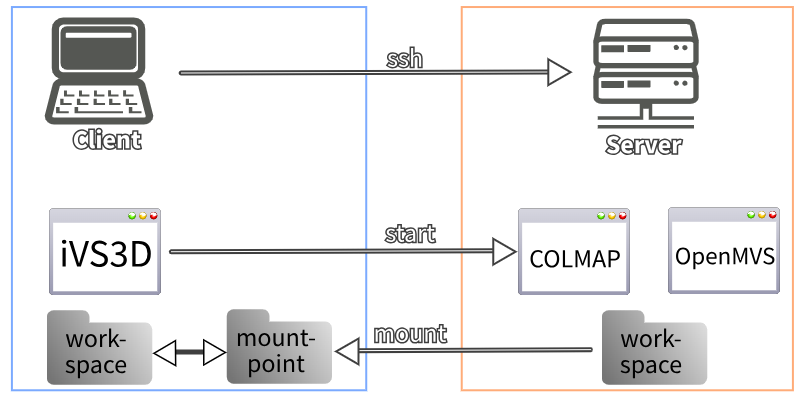
Our source video or image sequence is located on the client and iVS3D will be running there as well to perform the image selection. After exporting the images, iVS3D will transfer them to the workspace and start the reconstruction using COLMAP and the meshing and texturing using OpenMVS on the server. While this is running you can do other tasks on your machine and use iVS3D to check the progress.
| ⚠️ | To synchronize the workspace files, make sure to provide a shared directory that is accessible from both client and server! This can be done using sshfs or similar tools. |
Communication is done using ssh. You need to setup ssh-server on your server and make sure you can connect to it from your client:
If your server requires a password, make sure to create a ssh-key and copy it to the server using ssh-copy-id, otherwise iVS3D will not be able to start COLMAP and OpenMVS on your server.
For syncing data between the server and client, iVS3D reuires a folder from the server (we call it workspace) to be mounted to the clients file system. We call the mount point on the client mountpoint. This can be done using SSHFS.
Do not confuse the workspace on your client, the workspace on your server and the mountpoint! To clarify:
After you installed the required tools on the server and client, make sure you enabled ssh-server and mounted the workspace from the server to the mountpoint using SSHFS. Now we can start iVS3D on the client and open the Colmap-Wrapper-Settings. Choose SSH and enter your username and the server ip. You can pick a workspace on your client and select the mountpoint. iVS3D also needs the paths to COLMAP, OpenMVS and the workspace ON THE SERVER.
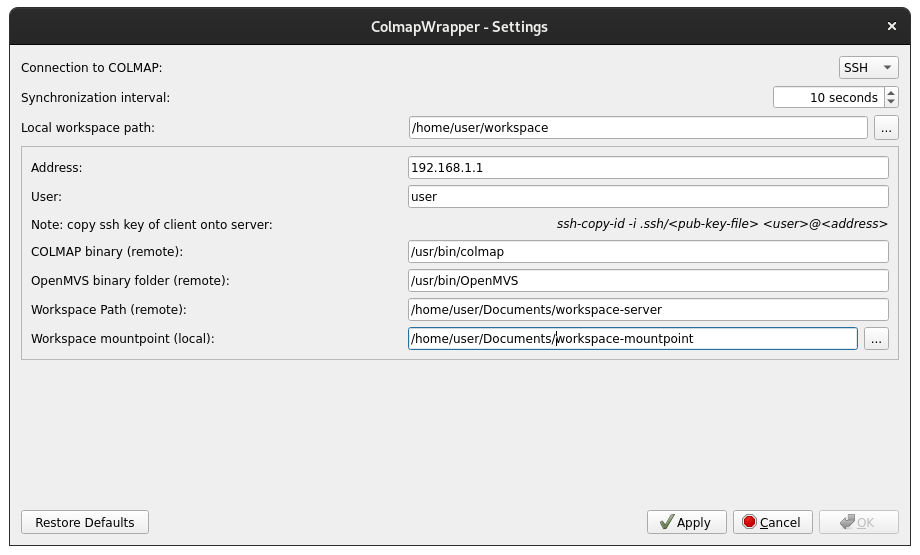
Once you entered all the required fields, apply the settings. If you did everything correct, iVS3D will accept your configuration and you can use the application as usual. However now the reconstruction, meshing and texturing will be executed on the server and do not occupy your client machine. You can follow the same workflow as shown here.